Odd Jobs
Not every job has to be a big job, sometimes a quick job is just as satisfying as a full tool-kit, sleeves up, many coffee’s kinda mission.
Not to Everyone’s Taste
One of the things I love about the car world is that everyone’s cars are unique to them. People come up with amazing ideas and modifications. People can (and do) spend thousands and thousands of monies on their cars and make some crazy power and looks, whilst others can spend a lot less but still make their car’s look and sound awesome!
One of the little, cheap modifications I’ve always loved is de-badging. I like how smooth and neat it looks with no badges on. I know not everyone likes this, but for me, this is a super effective way of making your car stand out a little bit and it costs £0 to do, which is basically free!
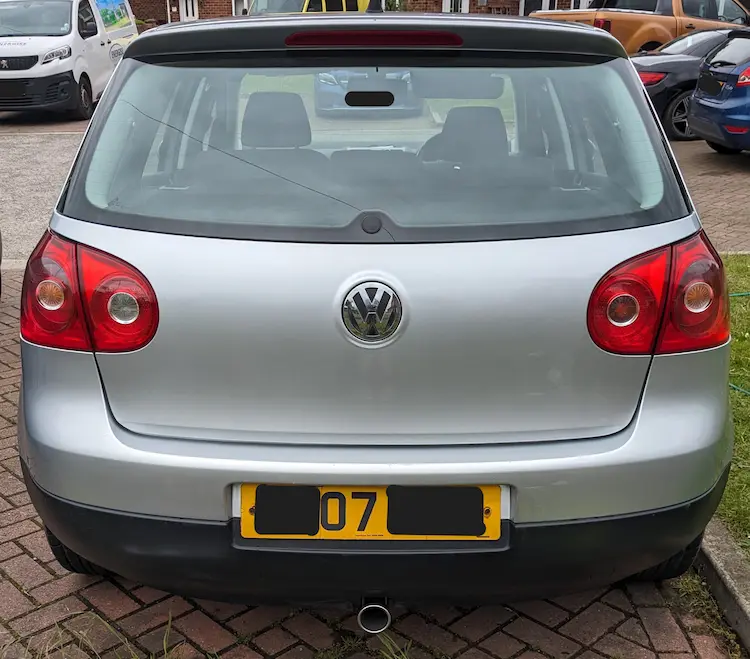
Again, at the start of this I wasn’t great at taking a lot of pictures (I do get better as I go on) so there is no ‘before’ picture, just an ‘after’. The badges that I removed were “GOLF” on the left hand side of the boot, and “TDI” on the right hand side.
I used a heat gun that I gently moved from left to right over the badges until the glue holding on the letters softened, then I used a plastic scraper to simply pop off each letter.
Once the letters were removed, I used some WD-40 and the plastic scraper to remove the excess glue left behind then I finished with a Michael Fibre Cloth and some Meguiar’s Ultimate Compound to finish it off.
This is the finished product:

I’ve just remembered, literally this second, whilst looking at the above picture the rear wiper was snapped off when I bought the car, leaving just the nubbin attached to the motor; I removed this too and bought a rear wiper delete off of eBay for a couple of quid!
I can’t fully remember what I did but I do know I was lucky because the nubbin left over was already loose, if it wasn’t loose I know I would have needed a puller tool to remove it. They’re not expensive, you can get one off of Amazon or eBay for £5-10.
Just the Tip
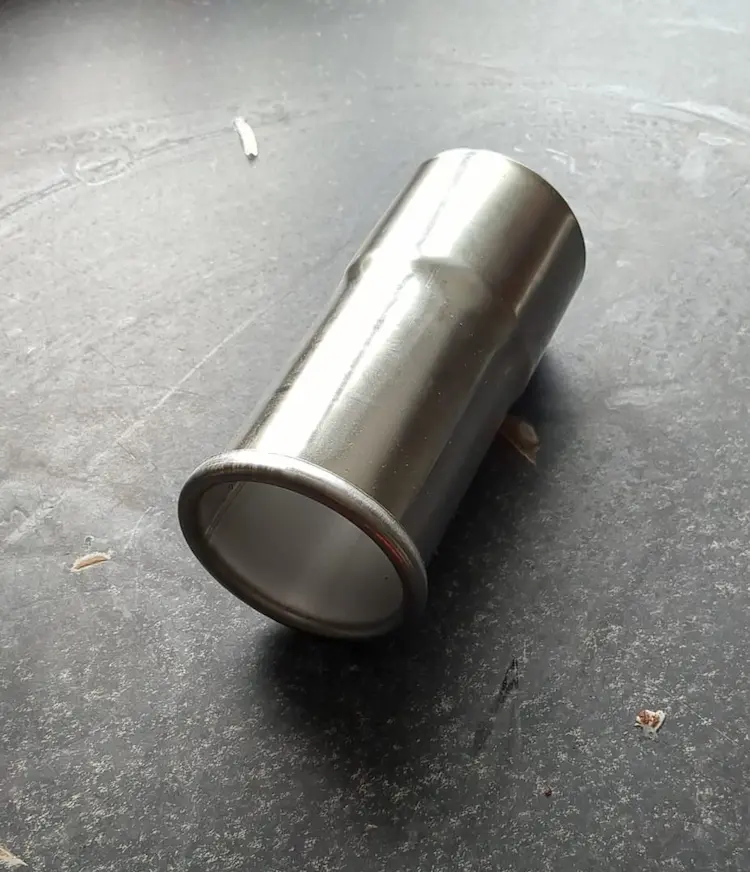
The centred exhaust came to an abrupt stop just behind the bumper so unless you knew it was there or you happened to be laying down with your head looking up and underneath my car, you wouldn’t know where the exhaust is. I did a little bit of measuring to find out the correct diameter then I jumped on eBay to find an exhaust tip that I liked.
The diameter of the exhaust pipe looked to be around 630mm. I’m old and grew up in the 90’s and early 2000’s reading Max Power and Redline magazines so I guess a lot of my favourite mod’s come from the car scene way back when. I remember seeing a white Ford Escort XR3i with a rolled exhaust tip in one of the magazines and teenage me must have really liked it because the image burnt itself into my brain box, so I opted for this stainless steel rolled exhaust tip from eBay for £15.
Here’s the link:
Now I just needed to do two things: make room for the tip to poke through and attach the tip to the exhaust pipe. One of these I have the ability and skills to do, the other I would need to call on a favour from a friend.
Health and Safety First
To make room for the tip I grabbed the Dremel tool out of my shed and also a newly purchased set of Aldi Special Buy files. I laid myself down on the carpark floor so I could see where the exhaust pipe ended and then used a small cutting disc on the Dremel to cut away a section of my lower bumper and set the exhaust free. Obviously personal safety is a number one priority when working on cars so whilst I laid on a car park floor with half my body under the car and the other half sticking out into the road, I used my built in safety specs whilst cutting the bumper.

then I used the files to de-burr the plastic and make it look nice and neat.
If you look closely you can see where I went a bit wrong with a file and put a big scratch to the left of the hole I cut #ProfessionalCarFixerMan
I Need a Real Man
One of the things that P and I lack in our combined arsenal of tools is a welder. P is a welder by trade (and a very good one as I’ve witnessed his welding IRL with my own eyes). However, I do have access to a welder at work and I also have access to the man who owns the welder at work, let’s call him G.
G is also a car man, he also knows many, many things about cars and he is also very talented with his tools so one day after work I called in a quick favour from him and asked if he’d grab his welder and welding mask and crawl under my car to quickly tack on my exhaust tip.
I was happy with how the exhaust tip looked, it’s unique.
After a bit of research I think I found the straight through exhaust system that is installed on my car on eBay:
It’s a cheap straight through cat back exhaust system which will do for now, it makes it a bit more growly but future plans definitely involve spending a bit more money on a full, proper, custom cat back exhaust.
Lesson time: A cat-back exhaust system is a performance upgrade that replaces the stock exhaust system from the catalytic convertor to the rear. These systems are designed to improve exhaust flow that often leads to increased horsepower and a better sounding, more aggressive noise.
Vanity Plates
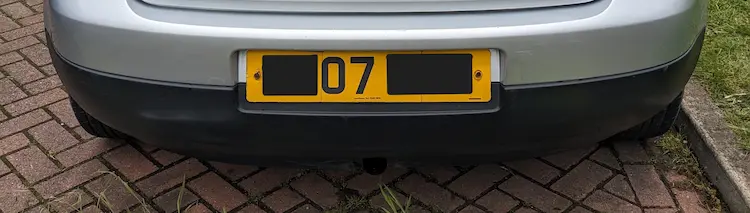
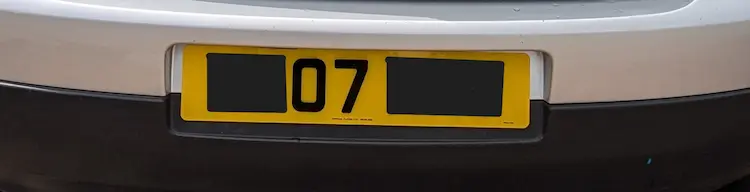
I’m not a fan of personalised number plates, I know some people like them but they’re not for me. My actual number plates do look a bit knackered and worn though, they have cracks and look a bit faded so they do need a re-vamp.
Amazon throws up all types of number plates when you search for them: standard ones, 4D, 3D and 2D laser cut or gel.
I’m not a fan of the 3D gel ones but quite liked the look of the 3D laser cut plates so I jumped out of my comfort zone and rather then just buying a pair of standard replacement ones I went with a pair of 3D laser cut plates.
I bought these ones from Amazon and customised them to my liking:
When they arrived, all I needed to do was to unscrew two screws on the old number plates, have a wipe around with a Michael Fibre cloth to get rid of hidden dirt then use the sticky pads (provided with the plates) to attach the new number plates to the bumper.
I went from looking all tatty like this
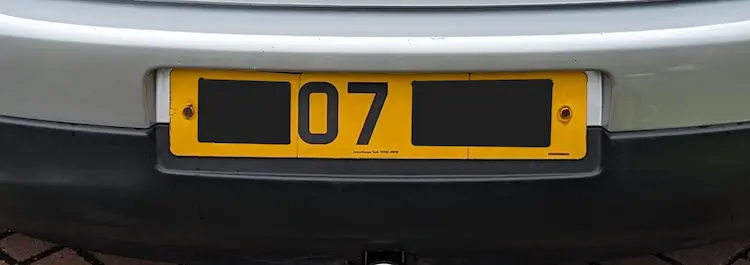
To looking at nice and shiny like this
Rag Tagging, Rat Dicking Time
If you remember my original plan to Rat-Rod our only car (I still stand by my awesome idea btw), you’ll also remember how me and the middle Daughter got totally out-voted. Well, I still like the idea and think I’ve found a way to give homage to Rat Rodding but without it being too garish and loud …. subtle sticker bombing!
Lesson time: sticker bombing is a sort of street art form where surfaces are covered in layers of different stickers, overlapping to create a visually dense and chaotic scene. The VW Rat Rodding scene in particular uses a lot of sticker bombing on their cars.
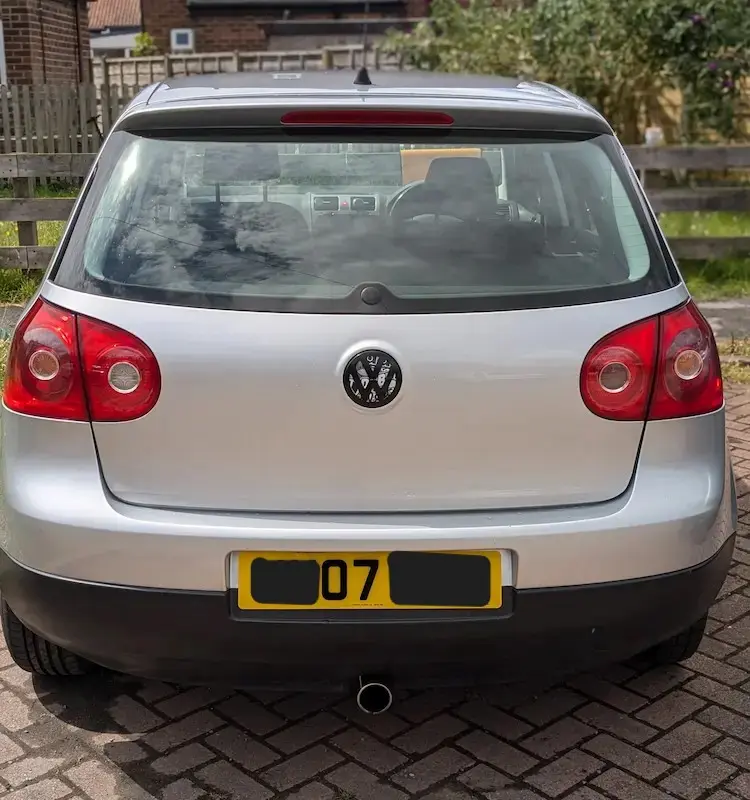
I really liked how clean and smooth the back end of the car was looking now with the new exhaust tip and de-badging but the VW boot badge was looking a bit tired, the silver was starting to peel and the black plastic back ground was faded; even after some bumper snot treatment.
I had an idea!
You can buy vinyl wrap sticker bomb sheets off of eBay for £3.89!
I also ordered some A4 black gloss vinyl wrap for £2.79
Then I proceeded to take off the boot handle VW badge using a plastic puller to pop out the clips that attach it to the lifting mechanism. Once the badge is released you can take the backing off too which is a circular piece of backing plastic.
I’ve never wrapped anything in my life but after watching a few YouTube videos I felt qualified enough to attempt some vinyl wrapping.
Working slowly (patience seems like the key skill when using vinyl wrap), and using a heat gun to gently warm the wrap to make it more pliable, I wrapped the silver VW badge in the black vinyl, then the backing disc in sticker bomb vinyl.
Turns out vinyl is actually super fun to work with and quite forgiving; you can keep peeling it back up and sticking it back down until you get it right without the stickiness disappearing and having to cut a new piece. Once the vinyl was flattened down and (mostly) bubble free I used a Stanley knife blade to trim the edges of the vinyl and stick the loose bits down underneath the back of the badge and backing circle.
This is the finished result
Now the arse was looking beaut!
Quality of Life Changes
I’ve concentrated a lot on the outside of the car so far so I thought I’d do a couple of inside bits.
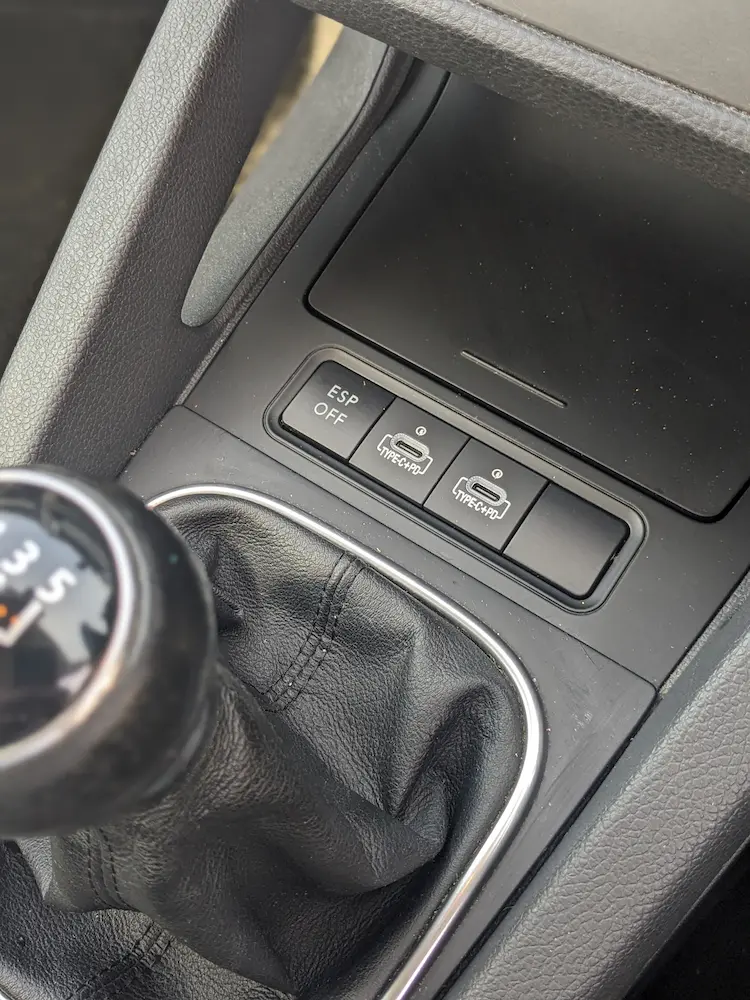
Firstly, I thought it’d be a good idea to bring my 17 year old shit box a little bit into the future by adding these:
I opted for a USB3.0 and a USB Type-C ports which came to a total of £20.48. I was slightly sceptical of these cheap electronic bits just because we’ve all been conditioned into believing anything cheap and electronic is going to blow us up as soon as we plug it in or set the whole car on fire but for £20 I was willing to take the risk. When I received the package through the post and opened it I was immediately put at ease because the USB 3.0 and Type-C sockets that I’d ordered actually turned out to be two USB Type-C sockets. This wasn’t really an issue and probably turned out to be a free upgrade to be fair but still, it wasn’t what I’d ordered. The kit came complete with everything needed to install it; two USB Type-C sockets, all the wiring and plugs.
When playing with electronics it’s always best practice to disconnect the battery: I ignored this advice and just cracked on with the install.
The first step is to start removing some trim, I used a flat head screw driver (a trim removal tool is probably a better idea but I don’t have one so a screw driver will also work) to carefully prise the plastic lip at the front of the base of the gear stick
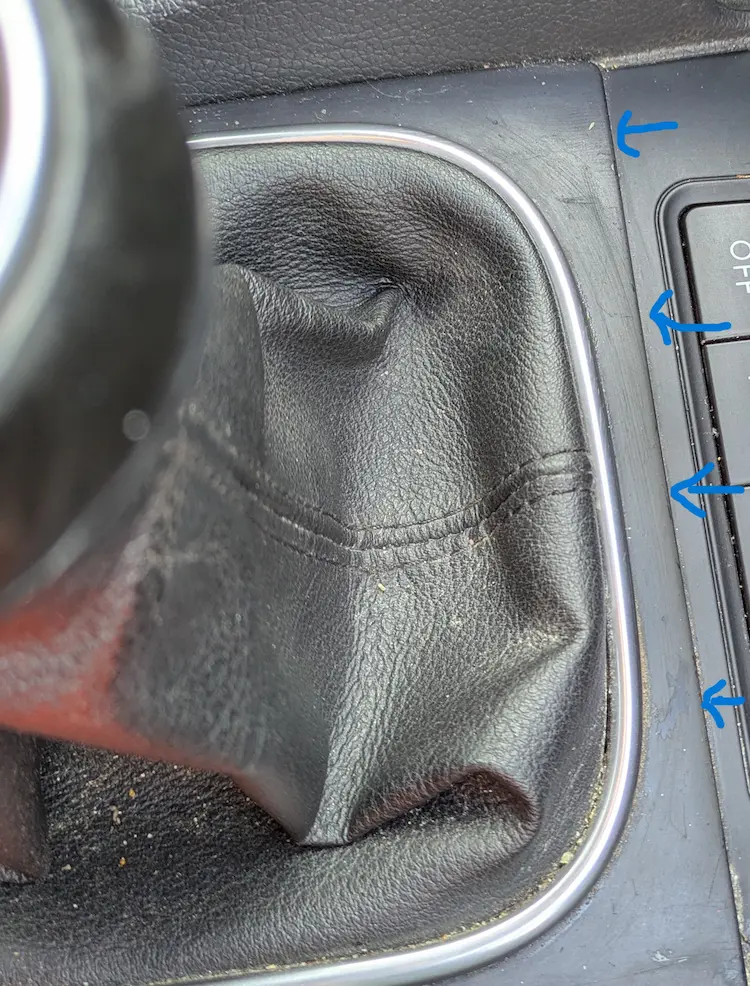
Once the trim has popped up you can lift the gear stick gator up and fold it over itself to keep it out the way. Once the gator is out the way there are two T20 torx bolts, one on the left and the other on the right, I unscrewed both of these. This releases the piece where the blanks/ESP Buttons are complete with the cigarette lighter and the ashtray.
Once the ashtray is removed you have access to the plug in the bottom of the cigarette lighter, I unplugged this then grabbed the new wiring loom that came with the kit. The plugs are pretty simple and only fit one way. I plugged one of the plugs into the bottom of the cigarette later and the other end of the new loom plugs into the 12V wire I originally unplugged. The next step was to pop out the blanks next to the ESP off button and slide the new USB sockets in. I then plugged the plugs from the new wiring loom into the back of the USB sockets. Then I simply placed everything back into place, screwed back the T20 bolts, lowered the gator and snapped the trim back into place. I turned my ignition on, plugged my phone in and I had successfully installed USB Type-C plugs in my car, easy peasy!
Hold My Beer
In the centre console of a Mark 5 Golf there are two cup holders. I initially thought these were a bit shit because a can would just flop about and spill everywhere because of how open they are. After some research though I discovered there’s actually a removable thing that slots in and grabs your drink for you. The original fitting was actually a bottle opener!
But, as a tight arsed Yorkshire man, I was very reluctant to pay £20+ for an original VW bottle opener. Instead, I found this 3D printed separator for £6
This simply and snuggly slides into the little rails that protrude from the edges of the cup holder.
These little jobs were all nice little easy mods/fixes that don’t cost a lot of money or take long to do. These types of jobs are great for when you don’t have loads of spare time but still want to do some car faffing.
Thanks for reading!
Obi xxx